Wednesday, June 6, 2012

Module 13: The Weak Force and the Strong Force.

The weak force? The strong force? What in the world are those? Up Quarks? Down Quarks? Gluons? I never learned that in school. If you're my age, you're right. You never learned that because it was not known, and hence not taught. Our understanding of the atom has increased much in recent decades. So update your knowledge. Read a current textbook. Watch the videos with the kids. You might be surprised what you learn.

Schedule:


We will probably spend a week listening to the movies and podcast and discussing them. I think I will follow up the movies with a corresponding worksheet right after we watch the movie.


Online Resources


Pod Cast from Astronomy Cast- The Strong and Weak Nuclear Forces. Very Informative

Periodic Table

The standard model of the atom. High School.


Bohr model worksheet.  Practice placing electrons using the Bohr Model.

History of our understanding of the atom worksheet. Very good. gr. 4-9


Bill Nye the atom


In Search of Giants part 1 of 15. Understanding the Standard Model. Highly Recommended


Kids and an atom smasher


Bohr Model. . 


How to Draw a Bohr-Rutherford diagram of the atom


How to Draw a Bohr-Rutherford model of the atom (advanced)


The Standard Model of the Atom


The Standard Model Explains Forces and Matter


Quarks

Saturday, May 26, 2012

Electromagnetism

This post correlates with Module 12 in Exploring Creation with Physical Science


Electromagnetism-what a huge subject. One people spend their whole life studying. So, obviously, what we explore here is only going to scratch the surface. It will only be an introduction to the topic. You could expand your own study to delve a little more deeply.

One book I highly recommend is the TOPScience: Electricity #32. This book takes a hands-on, discovery approach to electricity, and works well for elementary and middle school kids. You can order a hard copy, or download an ebook.

Schedule:
Before the week gets going, look at the experiments/labs and see what supplies you will need.:)
I do each section in about 1-1.5 hours. But I would take more time if I had it. This does not include watching videos, which we do while we eat lunch. I will let them play the games listed in the resource section on their own time. We also have a couple of electronic kits I will let them play with.

Section 1: History of James Clark Maxwell and Electrical Charges.

Section 2: Photons and the Electromagnetic Force 
                How Objects Become Charged

Section 3: Electrical Circuits


Online Resources


Bill Nye the Science Guy- Electricity


The Magic School Bus Gets Charged


Bill Nye the Science Guy- Magnatism


Games and resources that introduce particle physics in an understandable and enjoyable way. You can ask my kids, I am NOT a game person. Video games are highly restricted at my house. But they actually learn something with these. The photon catcher game goes will with this lesson.


Wonderful series on physics. #39 is on Maxwell's Equations. Comes with a worksheet. High School

High School Video Lessons on Physics, including electromagnetism


History of Maxwell


How Maxwell Unified Electricity and Magnetism- very good

Monday, May 21, 2012

Gravity, Centripetal Force and our Solar System

This post corresponds to module 11 in Exploring Creation with Physical Science.


This unit discusses gravity, centripetal force, the theory of relativity and how they relate to our solar system. My plan this week is to read and discuss the chapter with them. This can be done with whatever textbook you're using. I also plan to do the activities in the book and answer all the questions. I am going to substitute the water spinning in a bucket activity for the centripetal force activity listed in the book. Spinning a bucket with water in it over your head is a lot of fun. We will also watch the movies during lunch.


Schedule:
Day 1: Gravity
Day 2: Centripetal Force
Day 3: Solar System:
Day 4: Theory of Relativity
Day 5: Catch Up

Notes:
We were actually able to cover gravity and centripetal force in one lesson. It took about an hour.
We watch the videos during lunch, since I like to multitask. This works for us.


Online Resources


The Hubble Space site. Lots of good images and educational material for further exploration of the solar system.


water in a spinning bucket. centripetal force demonstration


great site with lots of links on gravity

podcast on gravity I really learned a lot from this podcast. Informative, but not to hard to understand. They have a whole series of astronomy podcasts. Definitely a good resource for 7-12 graders and scientifically inclined upper elementary.


Experiment: Bending Spacetime in the Basement


Bill Nye- Gravity


Magic School Bus Lost in Space


Einstein's Big Idea (PBS)


What Einstein Never Knew 1/6


What Einstein Never Knew 2/6


What Einstein Never Knew 3/6


What Einstein Never Knew 4/6


What Einstein Never Knew 5/6


What Einstein Never Knew 6/6

Sunday, May 13, 2012

Newton Got Things Rolling


This post correlates with Exploring Creation with Physical Science Module 10.

Kick off your study of Newton's Laws with "Newton's 3 Laws of Motion" from Disney. Unsurprisingly, you get Disney promo along with it, but it really does do a good job at discussing Newton's Laws. You can probably pick it up at the library, or buy it at Amazon. Here's the trailer.


Newton's Laws of Motion

Newton's Laws of Motion are really not that hard to understand. Motion, friction and inertia are things we experience everyday. Even a young child can understand that nothing moves without a force making it move. So teach these basic laws so that a five-year-old can understand it.  If your youngest child can grasp it, your older ones will grasp it. Once they grasp the basic thought, you can give the older ones more information to build on that simple principle.

Here's Newton's First Law for a five-year-old: Timmy, Newton said that things that aren't moving, like mommy's coffee cup, won't move unless something pushes or pulls it. We call that push or pull a force. Would you please come and pick up my coffee cup? You just applied a force to that coffee cup and made it move. Nothing in the whole world will move without a force making it move.

The second part of Newton's First Law says that objects in motion will keep moving in the same direction unless acted upon by a force. I'm going to give this lego guy a ride on the salt shaker. See, they are riding across the table together until, boom. The salt shaker bumped into the book. What happened to the lego guy? He flew off the front because there was no force to stop him.

I'm sure you catch on to the idea. The older kids are watching the younger kid and they all get it. After this you can talk about terms and any mathematical equations and fill the concept out more for the older ones while the little ones listen and play with legos or color. You can do any labs together. Watch any videos together. And then let everyone work on their grade appropriate worksheet at the same time. (The NASA link has great age appropriate worksheets to print out.)

Note:

I often see my five-year-old repeating the science demonstrations on his own. Something's sinking in.

Schedule: 

I would break Newton's Laws of Motion into three units and spend one to three days on each law. Read the textbook or explain it to them. Watch a video. Do a lab. (LABS ARE ESSENTIAL). Do a little worksheet to make sure they understand the terms and main concept.


We are also reading  Isaac Newton by Kathleen Krull . He was a pivotal character in history, so I want my kids to know about him. But this is not essential for science.

Videos on Motion


The Magic School Bus Plays Ball


Bill Nye : Motion


Worksheets on motion


worksheets on Newton's 3 laws of motion

Lectures on Newton's Laws of Motion 
from Kahn Academy

Newton's First Law

Newton's Second Law

Newton's Third Law

Links to Labs


Newton's First Law Lab

Newton's Laws of Motion from NASA

Newton's Second Law virtual lab from glencoe

Newton's Second Law Lab

Better Lab for 2nd Law

Tuesday, May 8, 2012

0 to 60: What's my Acceleration?

What kid (and adult for that matter), at some point in their life does not look at the speedometer? And as soon as they figure out that some cars go faster than others, life takes on a new dimension. Cars. 

So today's lesson starts in the car, or whatever your vehicle is.

Teacher Prep: Make sure you understand acceleration. Here is a good discussion of acceleration. You can also just read the textbook. Acceleration is the rate of change of velocity with time. Since velocity is a vector quantity- it has speed and direction- any time I change the speed or the direction I am accelerating. That is why I accelerate when I go around a curve even if I keep my speed the same. I have changed my direction. and since velocity is speed +direction, I have changed my velocity. And since acceleration is the rate of change of velocity, I am accelerating.

Materials Needed: car, stopwatch, acceleration worksheet, pens or pencils.

Activity:
Get all the kids in the car. Make sure they are buckled. Give one child a stop watch. If one child can safely see the speedometer from where they are sitting, make them the speed watcher. The next child gets to be the recorder. If you only have one child, he will be the timer and you will be the speed watcher. You will only record beginning and ending times and speeds.

Go to a place where there is not much traffic and the road is fairly straight. You will accelerate from 0 to whatever the speed limit is on the road. You can run this test several times, accelerating at different rates each time.
1. Come to a complete stop.  Make sure your timer and recorder are ready. Have your recorder write the beginning time and speed on the worksheet.
2. Have your timer say go and start timing.
3. Accelerate to whatever the speed limit is. (Please be safe.)
4. When you reach the speed limit, the speed watcher calls stop. Timer stops the stopwatch. 
5. Record the  final speed and final time.
6. Repeat several times.
7. Use the companion worksheet to figure out what your acceleration was.

Acceleration of gravity:

Galileo was the first to prove that the acceleration of a free falling object due to gravity was the same on heavy and light objects. The Galileo link under Resources on the Web has some great interactive media and a video showing the astronauts dropping a feather and a hammer on the moon.

Tree Climbing and Science. How cool can it get?

Here is an activity that calculates the height of an object by measuring the time of a free falling object. Great for all ages. My kids are tree climbers, so I let them climb a tree and drop 5 objects each from the spot they climbed to. I timed the drops and recorded them. Then we went inside and figured out how high they climbed. They loved it.

Resources on the Web:


explanation of acceleration from Kuhn Academy. Good Resource.


explanation of acceleration around a curve from Kuhn Academy.

Lesson Plan on Galileo experiments, written materials and videos


Monday, May 7, 2012

Running With Physics: An Introduction to Motion

Module 9: Exploring Creation with Physical Science

This week, I decided to give you kind of a script of how I plan to teach the concepts of motion to my 9th, 6th, 4th and K4 kids all at once.

This lesson begins outdoors. Get everyone to a place where they can run. Have a starting line marked off.

Okay everybody hold still. Look at me. Am I moving? How do you know? How can you tell? (It doesn't matter whether they say you are moving, or aren't moving. What you want from them is how they know you are or aren't moving.) You can tell I moved because my position changed. I used to be over here, and now I'm over there. MOTION is change in position over time.


In order to know what our change is, we have to have a REFERENCE POINT. Something that appears not to change it's position. When I compare myself to that point, I can tell whether or not I've moved.  For us, the REFERENCE POINT is this starting line. If I want to know how far I've run, I need to know where the starting point, my reference point is. How  far I run is relative to my starting point, my reference point. Let's have a little race. We are all going to run for 5 seconds. Everyone needs to start at the starting line, but I don't want anyone to run the same direction.  (Have a 5 second race. Measure how far everyone has run. Make sure everyone writes down their distances.)

Now with the information we have, we can figure out your AVERAGE SPEED- the average of how fast you were  going for the time that you ran. (Of course, the K4 won't get this. But he will like to know how fast he ran.). But from that information, can you tell where you ran to? No. To figure that out, you need to have direction.

Everybody back to the starting line. This time we are all going to run the same way.  From my compass, I can tell that the direction we are running is _______. (If you don't have a compass, give a good guess using the sun's position for guidance.). (Run the race again. Record everyone's distances, time and direction.)
With this information we can tell where we ran. That is VELOCITY. VELOCITY = speed plus direction.

Let's go inside and figure out our average speed and velocity.

RESOURCES:


Worksheet to go with Average Speed and Velocity activity


.

Good explanation of motion, speed, velocity, displacement and acceleration.


Thursday, May 3, 2012

Mountains of Playdough

Earth science is exciting! Studying about mountain formation is fascinating. But how to keep everyone engaged- that's the question. So instead of just reading about how mountains are formed, we formed them ourselves out of playdough.

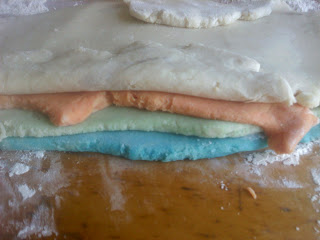
To begin with, I needed a lot of playdough. I multiplied the recipe by six, then divided the playdough into four balls and colored three of them different colors. We rolled out the balls into layers and cut them into four parts, because I have four kids doing this activity.


Next I assigned each kid a different type of mountain. One made the folded mountains, like our Blue Ridge Mountains. These were made by exerting  inward pressure on both sides of the slab. 


Another made block thrust mountains by cutting the play dough into three pieces and the outer two push on the inner block causing it to rise as a unit.


This is the dome mountain made by magma building up underneath the earth and pushing it upward.


The volcano mountain doesn't look that great. The orange is the magma that came out of the vent and solidified on top.


This is a mountain caused by the subduction of one plate under another.


This activity is not rocket science, and it's not art, but it did engage all the age groups and help them remember how mountains are formed.

Resources:
cream of tarter playdough recipe